How to make eyelet curtains.
|
| |
L'article "Confectionner des rideaux imprimés, doublés, à œillets" nous présentait la façon de réaliser des rideaux doublés. Dans ce nouvel article je vais vous expliquer comment poser facilement les œillets qui permettront de les suspendre sur une tringle.
|
The article "Create curtains using a printed fabric, with eyelets and lined" showed the way to make double-lined curtains. In this new article, I am explaining how to easily put the eyelets that enable to hang them on the suspension bar.
|
Nos rideaux sont prêts à recevoir les œillets : ils sont doublés, la tête et l'ourlet sont terminés. Leur hauteur a été correctement calculée.
|
Our curtains are ready to receive the eyelets: they are lined, the head and the hem are finished. Their height has been correctly calculated.
|
|
| |
La première étape - indispensable : calculer soigneusement le positionnement des anneaux sur le rideau.
Réaliser un schéma est bien pratique pour connaître le nombre nécessaire d'œillets et l'espace entre chacun d'eux.
Respecter deux impératifs :
· un nombre pair d'œillets,
· les deux extrémités du rideau doivent être dirigées vers le mur.
Attention de ne pas confondre le nombre d'œillets (pair) et le nombre d'espaces entre les œillets (impair).
Le schéma terminé, avant d'entamer la première découpe, il est préférable de vérifier l'exactitude des calculs en mesurant tous les emplacements sur le rideau - à l'aide d'épingles ou d'un marqueur effaçable à l'air.
Mon rideau comporte une couture au milieu que j'ai cachée dans un pli dirigé vers le mur.
| The first step - indispensable: carefully calculate the rings positioning on the curtain.
Drawing a pattern is very convenient to know the needed eyelets number and the space between each of them.
Respect two imperatives:
an even number of eyelets,
both curtains ends should face the wall.
Be careful, do not confuse the number of eyelets (even) and the number of spaces between the eyelets (odd).
When finished, before starting the first cut, it is better to check the accuracy of the calculations by measuring all the locations on the curtain - using pins or an air-erasable marker.
My curtain has a seam in the middle that I hid in a fold steered towards the wall.
|
|
| |
Généralement, on compte entre 12 et 20 cm d'espace entre deux œillets.
De plus, il faut laisser environ 5 à 10 cm entre le dernier anneau et l'extrémité du rideau (qui doit être dirigée vers le mur). Pour mon rideau, j'ai pu laisser 6,2 cm.
J'ai placé les œillets à 3 cm du bord haut du rideau.
|
Usually, there should be about 12 to 20 cm of space between two eyelets.
In addition, it is necessary to leave about 5 to 10 cm between the last ring and the end of the curtain (which must be steered towards the wall). For my curtain, I left 6.2 cm.
I placed the eyelets at 3 cm from the top edge of the curtain.
|
|
| |
La deuxième étape : dessiner les emplacements des œillets.
Voici un gabarit bien pratique pour positionner exactement et régulièrement les anneaux en suivant le calcul préétabli. Aucune mauvaise surprise à l'arrivée !
Les trous doivent correspondre à la dimension intérieure de l'œillet pour que le tissu soit pincé entre les deux anneaux.
| The second step: drawing the eyelets locations.
Here is a useful template for an exact and regular rings positioning, according the pre-established calculation. No unpleasant surprise when finished!
The holes should match the inner eyelet dimension so that the fabric is pinched between the two rings.
|
|
| |
Positionner le repère du milieu du gabarit sur le milieu du rideau. À l'aide d'un stylo effaçable ou d'un crayon, tracer l'emplacement du premier œillet en partant vers la gauche. Puis positionner le trou droit du gabarit sur le tracé du premier œillet et dessiner l'emplacement du second œillet (trou gauche du gabarit). Et ainsi de suite jusqu'au bord du rideau.
Procéder de la même manière pour côté droit.
|
Place the mid-template marker on the middle of the curtain. Using an erasable pen or pencil, trace the location of the first eyelet going to the left. Then position the right hole of the template on the first eyelet drawn and draw the location of the second eyelet (left hole of the template). And so on to the edge of the curtain.
Proceed in the same way for right side.
|
|
|
|
La troisième étape : placer les œillets sur le rideau.
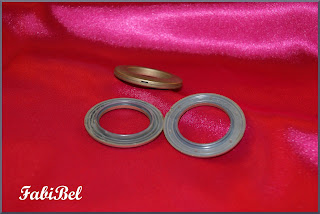
Les œillets à clipser sont constitués de deux anneaux, un "mâle" avec des picots, et une "femelle" avec une collerette dans laquelle les picots vont s'insérer.
| The third step: place the eyelets on the curtain.
The eyelets to be clipped are made up of two rings, a "male" with pins, and a "female" with a collar in which the pins are inserted.
|
Une fois les emplacements des trous dessinés, il faut les découper. La découpe doit coïncider exactement avec la dimension intérieure de l'œillet.
|
Once the holes locations have been drawn, they must be cut. The cutout must match exactly the inner dimension of the eyelet.
|
|
| |
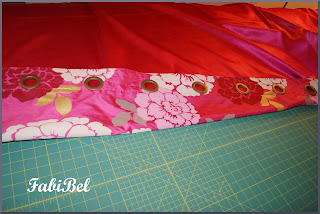
Insérer un des anneaux sous le tissu dans une découpe, puis clipser l'autre anneau sur le premier.
|
Insert one of the rings under the fabric into a cutout, and then clip the other ring over the first.
|
|
| |
Un petit clic confirme que l'opération est réussie.
|
A small click confirms that the operation is successful.
|
|
|
|
La première étape de calcul est la phase la plus laborieuse. Mais lorsqu'elle est soigneusement réalisée, la pose des anneaux est extrêmement simple et ne présente aucune difficulté.
|
The first calculation step is the hardest part of the work. However, when it is carefully carried out the fixing of rings is very easy.
|
|
|
|
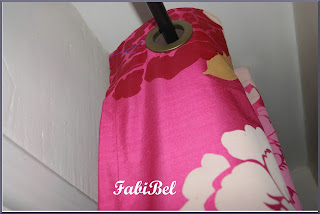
Et voilà, c'est terminé, il ne reste qu'à suspendre le rideau !
|
And that's all, there's nothing left but to hang the curtain!
|
|
| |


Aucun commentaire:
Enregistrer un commentaire