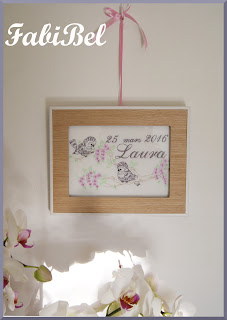
A birthday gift: a small customized embroidery frame.
Une petite Poupinette vient de naître : l'arrivée de Laura a suivi de quelques jours celle du printemps.
|
A little Poupinette is born: the arrival of Laura followed a few days those of spring.
|
Ma machine à broder reprend du service : un petit cadeau personnalisé pour marquer cet heureux événement…
|
My embroidery machine is back in service: a small personalized gift to mark this happy event ...
|
Un projet figure dans ma liste "à essayer" : une broderie encadrée devrait être une idée déco sympa pour une chambre de bébé. Voici donc l'occasion de le tenter, en personnalisant le motif de broderie.
|
One proposal is listed in my "to try list": a framed embroidery should be a nice decoration idea for a nursery. This is the opportunity to try it, customizing the embroidery pattern.
|
Rangés dans un placard, quelques petits cadres attendent leur destination…
|
Stored in a closet, some small frames are awaiting for their destination…
|
Première étape : concevoir le motif de broderie à l'aide du logiciel 4D Embroidery.
En mesurant les dimensions intérieures du cadre, j'ai défini la taille maximale du motif de broderie.
J'ai donc choisi un motif de broderie au bon format : deux oisillons qui s'ébattent sur une branche fleurie. J'ai réussi à caser dans l'angle libre, à droite, la date de naissance et le prénom du bébé.
Sur l'image ci-dessous à droite, on aperçoit en arrière-plan la grille qui est affichée en centimètres par le logiciel de broderie.
| First step: designing the embroidery design using the 4D Embroidery software.
Measuring the interior frame dimensions, I found the maximum size of the embroidery pattern.
Therefore, I chose an embroidery design in the good format: two chicks frolicking on a flowering branch. I managed to place in the right free angle, the birth date and the baby's name.
In the right picture below, in the background you can see the grid in centimeters that the embroidery software displays.
|
Deuxième étape : choisir le support et les fils de broderie.
J'ai choisi une toile blanche comme support de broderie.
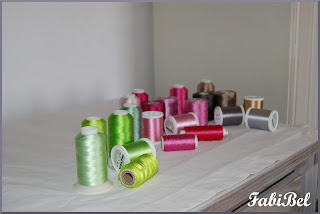
La sélection des couleurs de fils est plus délicate ; je crois que plus on dispose de couleurs, plus le choix est difficile. En général, j'ai une attirance pour le vert chartreuse associé au rose fushia. Cependant, pour un nouveau-né, des couleurs moins vives seront sans doute plus appropriées :
• vert tendre pour le feuillage,
• noisette clair pour la branche,
• rose moyen pour les petites fleurs,
• taupe, légèrement rosé pour les petits oiseaux et les inscriptions,
• brun très foncé pour leurs pattes et leur bec.
| Second step: choose the backing and embroidery threads.
I chose a white canvas as embroidery backing.
The selection of colors threads is more difficult; I think more colors you have, more difficult your choice will be. Usually, I have an attraction for chartreuse associated with fuchsia pink. However, for a newborn, less bright colors will probably be more appropriate:
• soft green for the foliage,
• light hazel for the branch,
• medium pink for small flowers,
• taupe, slightly pink for small birds and writing,
• very dark brown for their legs and beak.
|
Troisième étape : réaliser la broderie.
Le support de broderie est préparé comme je le décris dans le premier article de la rubrique "Broderie" ; il ne reste plus qu'à lancer la machine qui va exécuter automatiquement le motif.
Instant magique !
| Third step: making embroidery.
The embroidery backing is getting ready as I describe in the first article of the "Embroidery", it only remains to start the embroidery machine, which will automatically run the pattern.
Magic moment!
|
Quatrième étape : insérer la broderie dans le cadre.
Après avoir coupé un carton contrecollé rigide aux dimensions du cadre, je le recouvre une feuille fine de ouatine destinée à bien tendre la toile brodée. Je retourne puis je colle les bords dépassant sur l'envers du contrecollé. Je dispose le tout contre la vitre du cadre.
Il ne reste plus qu'à replacer et à maintenir l'arrière du cadre en réutilisant ses fixations d'origine.
| Fourth step: insert the embroidery into the frame.
After cutting the rigid paperboard matching the frame dimensions, I put a thin sheet of fleece intended to stretch the embroidered canvas. I turn and I glue the exceeding edges on the back of the paperboard. I put all behind the frame glass.
It only remains to put back and keep the frame back by reusing its original fixings.
|
Et voilà, le tour est joué !
|
And you're done!
|
Bienvenue à la petite Laura et félicitations aux heureux parents !
|
Welcome to baby Laura and congratulations to the lucky parents!
|


Aucun commentaire:
Enregistrer un commentaire