Machine embroidery: how to make easily a perfect applique.
| |||||
En broderie, un "Appliqué" est une pièce de tissu qui est "appliquée", c'est-à-dire cousue, sur une autre pièce de tissu ; l'objectif étant de créer un motif par le contraste de couleurs ou d'imprimés entre les deux textiles superposés.
Pour un résultat parfait, sa réalisation à la machine à coudre demande une certaine habileté ou une grande concentration.
Une machine à broder permet d'exécuter des appliqués impeccables sans difficulté.
|
An "Applique" embroidery design is a piece of fabric placed, that is to say sewn, on another piece of fabric; the goal being to create a design by contrasting colors or printed between the two overlapped textiles.
For a perfect result, this fulfilment with the sewing machine needs skill or high concentration.
An embroidery machine makes impeccable Applique without any difficulty.
| ||||
La première démarche consiste à choisir un motif de type "Appliqué" à broder en le sélectionnant dans notre "librairie" personnelle de motifs à broder gérée par le logiciel de broderie installé sur notre ordinateur.
Pour illustrer cet exemple, j'ai choisi un simple cercle, comme le montre ci-dessous l'écran de mon PC.
|
The first step is to choose an "Applique" embroidery design in our own "embroideries library" which is run by the embroidery software installed on our computer.
To illustrate this example, I chose a simple circle, as the screen of my PC shows below.
| ||||
| |||||
La fenêtre située en haut à droite affiche quatre pavés de couleurs qui constituent chacun une étape dans la réalisation de la broderie :
Ils matérialisent les changements de couleur de fils, c’est-à-dire l'arrêt de la machine à la fin de chacune de ces opérations. En fait, peu importe la couleur des fils qui seront employés pour la broderie, une seule couleur peut très bien être utilisée. Ce qui compte c'est l'arrêt de la machine avant de passer à l'étape suivante.
Ma machine à broder n'est pas reliée à mon ordinateur, aussi le motif de broderie choisi doit être enregistré sur une clé USB qui permet le transfert du motif vers la machine à broder.
|
The window at the top right displays four color blocks, each one is a step in the embroidery process:
They represent the threads colors changes, that is to say the stop of the machine at the end of each of these operations. Actually, no matter what thread color will be used for embroidery, only one color can be used. The most important is the machine shutdown before moving on to the next step.
My embroidery machine is not plugged to my computer, so the embroidery pattern chosen must be saved on a USB stick to be transferred towards my embroidery machine.
| ||||
| |||||
Sur la machine à broder, dans le cadre à broder, nous avons tendu notre tissu (blanc) qui est le support du motif contrasté.
Première étape : le cercle en fil blanc.
La machine à broder pique un simple cercle qui signale l'emplacement et la dimension de l'appliqué. Puis la machine s'arrête.
|
On the embroidery machine, in the embroidery frame, we stretched our fabric (white) which is the support of the contrasting pattern.
First step: the circle with the white thread.
The embroidery machine stitches a simple circle showing the applique place and size. Then the machine stops.
| ||||
| |||||
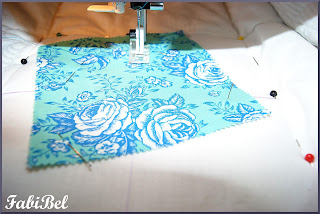
Grâce à ce premier tracé nous pouvons positionner en l'épinglant la pièce de tissu contrasté exactement à l'endroit prévu par le motif.
|
Thanks to this first mark we can put and pin the contrasting fabric piece exactly to the place provided by the thread drawing.
| ||||
| |||||
Deuxième étape : le cercle de fil noir.
La machine exécute encore une simple piqure en cercle sur le tissu imprimé puis s'arrête.
| Second step: the circle of black thread.
The machine stitches again a simple circle on the printed fabric and then stops.
| ||||
| |||||
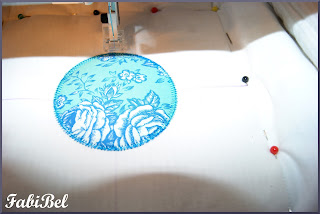
Nous devons maintenant couper au ras de la piqure extérieure le tissu imprimé.
|
We have now to cut the printed fabric to the level of the outer stitch.
| ||||
| |||||
Troisième étape : le tracé du fil bleu.
La machine fixe la découpe de tissu par un point zigzag et s'arrête de nouveau. Si nécessaire on peut alors changer la couleur du fil qui finira la broderie.
| Third step: the drawing of the blue thread.
The machine stabilizes the fabric cut by a zigzag stitch and stops again. If necessary, we can change the thread color that will end the embroidery.
| ||||
| |||||
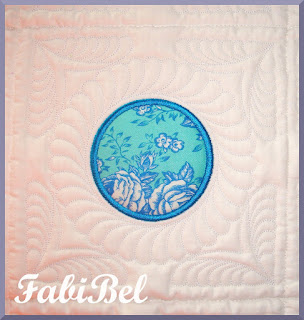
Quatrième et dernière étape : le tracé du fil vert.
La machine termine notre appliqué en effectuant un superbe point satin sur le pourtour du cercle.
| Fourth and last step: the green thread drawing.
The machine finishes our applique by making a superb satin stitch on the circle edge.
| ||||
|
| ||||
| |||||
L'exemple du cercle que je donne ici est simple, mais certains motifs peuvent être un peu plus complexes et nécessiter plusieurs imprimés comme les deux clowns qui jonglent sur la couverture de bébé de la Parure de lit pour Pipounet.
Voilà, maintenant vous savez tout sur le principe de "l'Appliqué" réalisé en automatique par une machine à broder.
Dans l'article "Broderie machine : quelques réponses basique à quelques questions basiques" j'explique le fonctionnement de ma machine à coudre et à broder. |
The example of the circle I give here is simple, but some designs can be a bit more complex and require several printed fabrics like the two clowns juggling on the baby blanket A crib bedding set for Pipounet..
Now, you know everything about the aim of "the Applique" automatically fulfilled by an embroidery machine.
In the article "Machine embroidery: some basic answers to some basic questions" I explain how my embroidery and sewing machine works. | ||||
| |||||


Aucun commentaire:
Enregistrer un commentaire